Why I Built My Own Solar Backup Instead of Buying a Jackery, Bluetti, or EcoFlow (And What It Cost Me)
If you’ve ever looked at a Jackery Explorer, a Bluetti AC200, or an EcoFlow Delta and thought “that’s exactly what I need” — I had the same thought. They’re compact, they look professional, and they just work out of the box.
Then I looked at the price, the capacity limits, the fixed battery, the closed software, and the lack of any real integration with my home automation system. And I decided to build my own.
This is the honest story of what I built, what it cost, what I got wrong, and whether it was actually worth it.
What a commercial unit gives you:
Brands like Bluetti, EcoFlow, and Jackery have genuinely good products at the high end. You get a clean enclosure, a built-in display, AC and DC outputs, and in most cases a decent app for monitoring.
For many people, that’s enough — and there’s nothing wrong with that.
But before committing to a DIY build, I tested a budget power station that promised similar specs at a fraction of the price. What I found was a lesson in why cheap alternatives cut corners where it matters most: unreliable charging connectors, inaccurate power readings, controls that didn’t actually control anything, and zero remote monitoring capability.
Even the reputable brands have limits that matter if you want a system that adapts to you. First, they force you to spend a large amount of cash upfront — you can’t buy “half an EcoFlow” now and upgrade it next month. You are stuck with a massive upfront cost, fixed internal batteries you can’t replace, closed ecosystems with no API, and no way to connect to a home automation system like Home Assistant.
What a DIY system gives you
Building your own system is not for everyone. It takes time, research, and a willingness to make mistakes. But if you’re comfortable with basic electronics and you want a system that truly works for you, the advantages are significant.
Here’s what I gained by going DIY:
Full visibility. Every component is known and accessible. I know exactly what’s inside, what it does, and how to replace it if it fails. No black box, no proprietary firmware.
Real monitoring. Using a Victron BMV-712 battery monitor with a 500A shunt, I have precise data on state of charge, voltage, current, and battery health — all accurate, all real-time.
Home Assistant integration. This is where it gets interesting. Because the Victron components communicate via Bluetooth, and my Home Assistant instance is too far away to reach them directly, I built a custom ESP32-S3 gateway that receives all Victron Bluetooth data and retransmits it over WiFi. The result: full solar system monitoring inside Home Assistant, with automations, alerts, and history graphs. No commercial unit offers anything close to this.
Expandability. Need more capacity? Add a battery. Need more input? Add a panel. Need a different inverter? Swap it. The system grows with your needs instead of forcing you to buy a new unit.
Repairability. Every component is a standard, replaceable part from a known manufacturer. Victron equipment in particular has an excellent reputation for longevity and support.
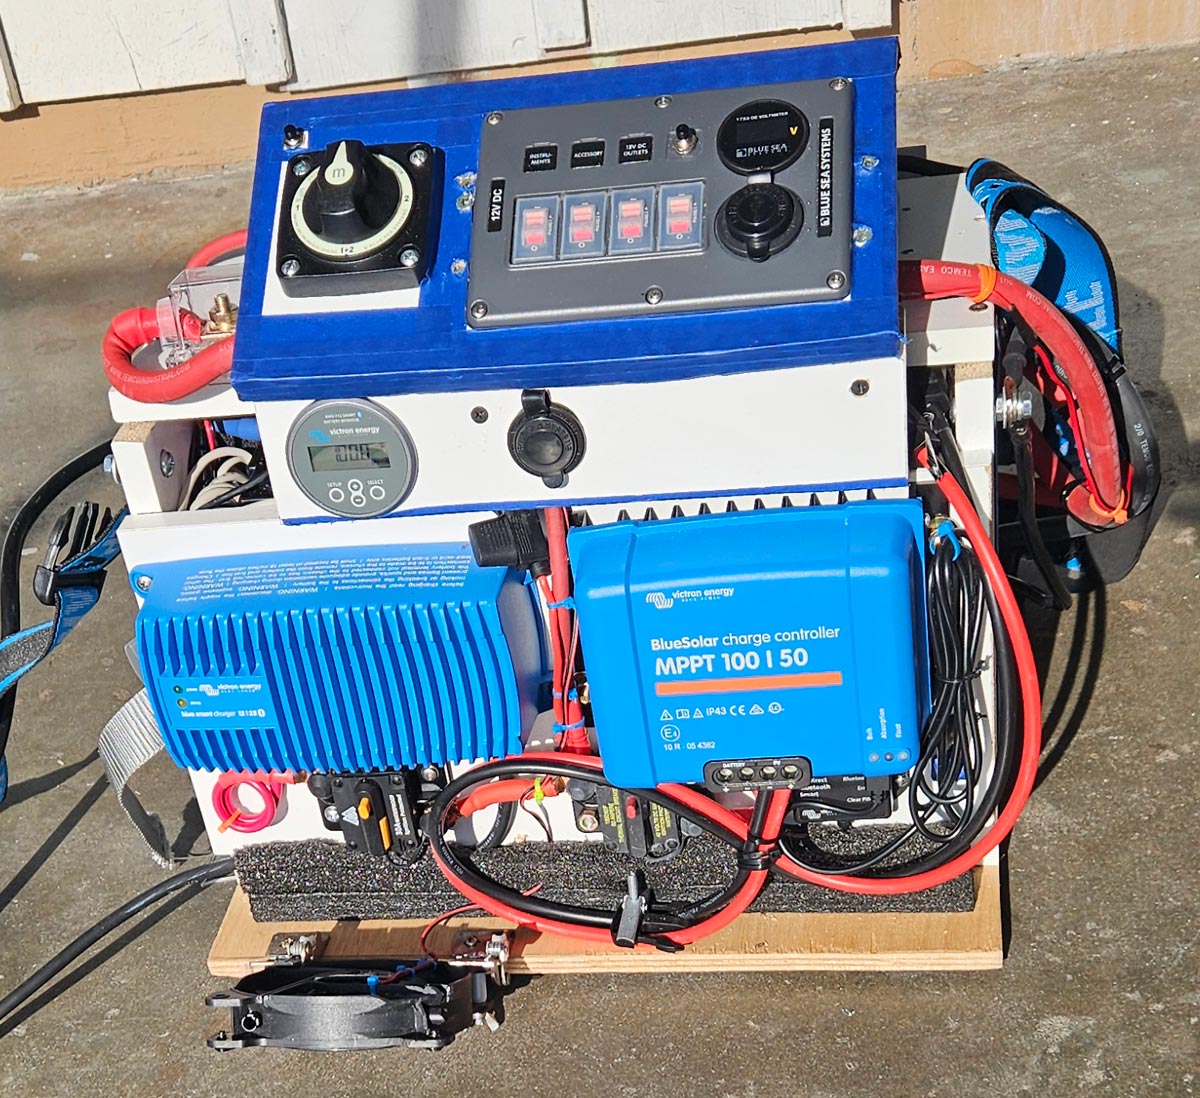
My actual components and real costs
Here’s what my system is made of, and what I actually paid. Most of these components were bought used or refurbished — that’s part of the strategy.

| Component | Price |
|---|---|
| Victron BlueSolar MPPT 100/50 + Bluetooth dongle | $115 |
| Victron Blue Smart Charger IP67 12V 25A | $65 |
| Victron Orion XS DC/DC 50A, Battery-to-battery charger | $260 |
| Victron BMV-712 + 500A shunt, Battery monitor | $90 |
| Xantrex Freedom 2000W, Inverter | $110 |
| Blue Sea Systems panel, 12V distribution + fusing | $45 |
| AmpereTime 12V 100Ah LiFePO4 Battery | $110 |
| Renogy portable panels (x2), 220W each, foldable | $220 |
| Temco Wiring, Pure copper, no alloys, lugs, fuses | $200 |
| ESP32-S3 gateway, Custom Bluetooth-to-WiFi bridge | $7 |
| Enclosure, Hand-built wood box | $0 |
| TOTAL | $1,222 |

One important note on the cost comparison: my $1,222 total includes two 220W Renogy solar panels ($220) and premium Victron and Xantrex components. A comparable commercial unit with 1200Wh capacity, a 2000W inverter, and LiFePO4 chemistry runs between $1,500 and $2,500 new — and they are priced without panels.
But here is the real DIY secret that nobody tells you: you don’t need to spend $1,222 on day one. In fact, you can start with almost nothing.
With a commercial unit, it’s all or nothing. With a DIY system, you can build your way up using scrounged, used, or salvaged materials. If your budget is tight, you can start with an old car battery that still has a bit of life left, a second-hand solar panel with a few scratches, a reliable Victron MPPT controller, and a few basic cables and breakers. That’s it. You can get a baseline emergency system running for under $150.
Later on, when the budget allows, you can add a small, inexpensive inverter to power basic AC devices. After that, you can swap that tired car battery for a proper LiFePO4 pack that guarantees reliable energy. Then, you add more panels.
My system looks expensive because it’s finished, but it was built in stages. It’s modular, it’s scalable, and it can start as humbly as you need it to.
One note on the enclosure: I built it myself from wood scraps with no carpentry skills. It works, but it’s clearly the weakest part visually. A future version will use a proper rack or metal enclosure. Sometimes done is better than perfect.

The parts you don’t see in the box
This is the part that separates a DIY system from anything you can buy.
Every Victron component in my system communicates via Bluetooth — the MPPT, the BMV-712, the Orion, the Smart Charger. Victron’s own app, VictronConnect, reads all of them beautifully. But VictronConnect is a phone app. It doesn’t trigger automations, and it doesn’t talk to Home Assistant.
The official Victron solution is a Cerbo GX — a dedicated monitoring hub that runs about $200. It works well, but it’s another box, another cost, and still requires configuration.
My solution cost about $7.
I programmed an ESP32-S3 microcontroller to continuously scan for Bluetooth advertisements from all my Victron devices, parse the data, and retransmit it over WiFi via MQTT to my Home Assistant instance — which runs on a Raspberry Pi 5 on the other side of the house.
The result: every Victron metric — battery voltage, state of charge, solar input watts, charging current, inverter status — appears in real time inside Home Assistant. I built dashboards, set up low battery alerts, and created automations that respond to the system’s state automatically.
This kind of integration is simply not possible with any commercial power station. Not the Bluetti. Not the EcoFlow. Not the Jackery. Some have apps, some have APIs, but none of them speak MQTT natively or integrate cleanly with Home Assistant without third-party workarounds.
If Home Assistant integration matters to you — and if you’re reading this blog, it probably does — this alone justifies the DIY approach.
But the ESP32 gateway isn’t the only invisible part of this system.
The enclosure also connects to two 220W Renogy foldable solar panels via standard MC4 connectors — portable, storable, and deployable wherever sunlight is available. During a hurricane situation, that flexibility is critical.
Inside the house, a satellite panel extends the system’s reach with a dedicated Xantrex inverter remote control — so I can turn the 2000W inverter on and off without going to the main enclosure — plus four USB 3.0 fast-charging ports for phones, tablets, and small devices. During a power outage, that satellite panel becomes the central hub for keeping the household connected and running.
No commercial unit ships with a remote dashboard. No commercial unit lets you place charging ports exactly where you need them. These are the details that make a custom system genuinely more useful than a beautiful box on a shelf.
Mistakes I made (and what they taught me)
This section exists because most DIY guides show you the finished result. Nobody talks about the path to get there. Here’s mine.
Mistake #1: Trusting a breaker where a fuse belongs
I started this build with a Chinese 3000W inverter — good reviews, reasonable price, solid margins over my battery’s BMS limit. I wired everything carefully, added breakers at every point I thought needed protection, including a 120A marine breaker on the inverter feed.
During a 900W load test, I accidentally leaned against that breaker. Not enough to open it intentionally — just enough contact to cause an arc inside. That arc took out the inverter instantly. The BMS detected the fault and disconnected, refusing to reconnect.
The lesson: for high-current DC inverter feeds, a breaker is the wrong device. An arc can form on contact without fully opening the circuit.
The correct solution is a high-quality, fast-acting fuse — specifically an ANL or MRBF fuse — which interrupts the circuit completely and instantly without the arc risk. I replaced the breaker with a 100A ANL fuse for the final setup.
Mistake #2: Ignoring inrush current
I replaced the damaged inverter with a Renogy 3000W unit, properly fused this time. But the system behaved inconsistently — sometimes it powered up normally, other times the BMS would cut immediately on startup.
The cause: large inverters draw a massive inrush current when first powered on, as their internal capacitors charge. That spike was enough to trigger my BMS’s overcurrent protection before the inverter even had a load connected.
The solution is a precharge circuit — a resistor that limits initial current flow, allowing the capacitors to charge gradually before full power is applied. I built a simple precharge switch with a resistor, and the problem disappeared. For any inverter above 1000W, this is not optional — it’s essential.
Mistake #3: Oversizing the inverter for the battery
Even with the precharge solution working, I realized 3000W was too ambitious for a 100Ah LiFePO4 battery with its BMS limits. The math simply didn’t support it under real load conditions.
I replaced it with a Xantrex Freedom 2000W — a unit with an excellent reputation in the RV community, with transfer switch, and a remote control panel. At 2000W it stays within realistic operating margins for my battery, and it hasn’t given me a single problem since.
The precharge switch is still there. I use it every time before powering on. Old habits from hard lessons.
Mistake #4: No access hatch for the battery
I built the enclosure from the inside out — components first, enclosure around them. It made sense at the time. What I didn’t plan for was maintenance access to the battery.
The battery is now completely enclosed with no hinge, no door, no removable panel. If I ever need to service or replace it, I have to partially disassemble the enclosure.
It works. But the next version will have a proper access door from day one.

Is it worth it? Honest answer
I live in South Florida. Every other year, a hurricane reminds me why this system exists. Two weeks without power is not a worst-case scenario here — it’s a realistic one.
So yes. For me, it was absolutely worth it.
But let me be honest about what “worth it” actually means.
It costs about the same as — or even less than — a premium commercial unit. My total came to around $1,200 with solar panels included. While it’s not a ‘dirt-cheap’ budget solution, and you have to factor in your research and build time, the real financial win is the quality. For the price of a mid-range EcoFlow, I got top-tier Victron and Xantrex components that will last for years.
It took time. Not just build time — research time, mistake time, fix-it time. If you have no interest in understanding how things work, this path will frustrate you.
It has rough edges. My enclosure is wood. It’s functional, not beautiful. A Bluetti looks better on a shelf.
But here’s what the commercial units can’t give me:
A system I completely understand. Components I can replace individually without buying a new unit. Real-time monitoring inside Home Assistant with automations and alerts. A $7 ESP32 doing the job of a $200 Cerbo GX. Solar panels I can carry outside and point at the sun. A remote panel inside the house with four USB fast-charge ports. And the knowledge that if something fails, I can fix it myself.
Living in a hurricane zone changes your relationship with power. You stop thinking of electricity as something that’s always there, and start thinking of it as something you need to manage. This system gave me that control.
Would I recommend it to everyone? No. But if you’re the kind of person who reads this far into a DIY article, you’re probably the kind of person who would find it as rewarding as I did.
If you want to build something similar and have questions, reach out at henry@domox.tech — I’m happy to help.
